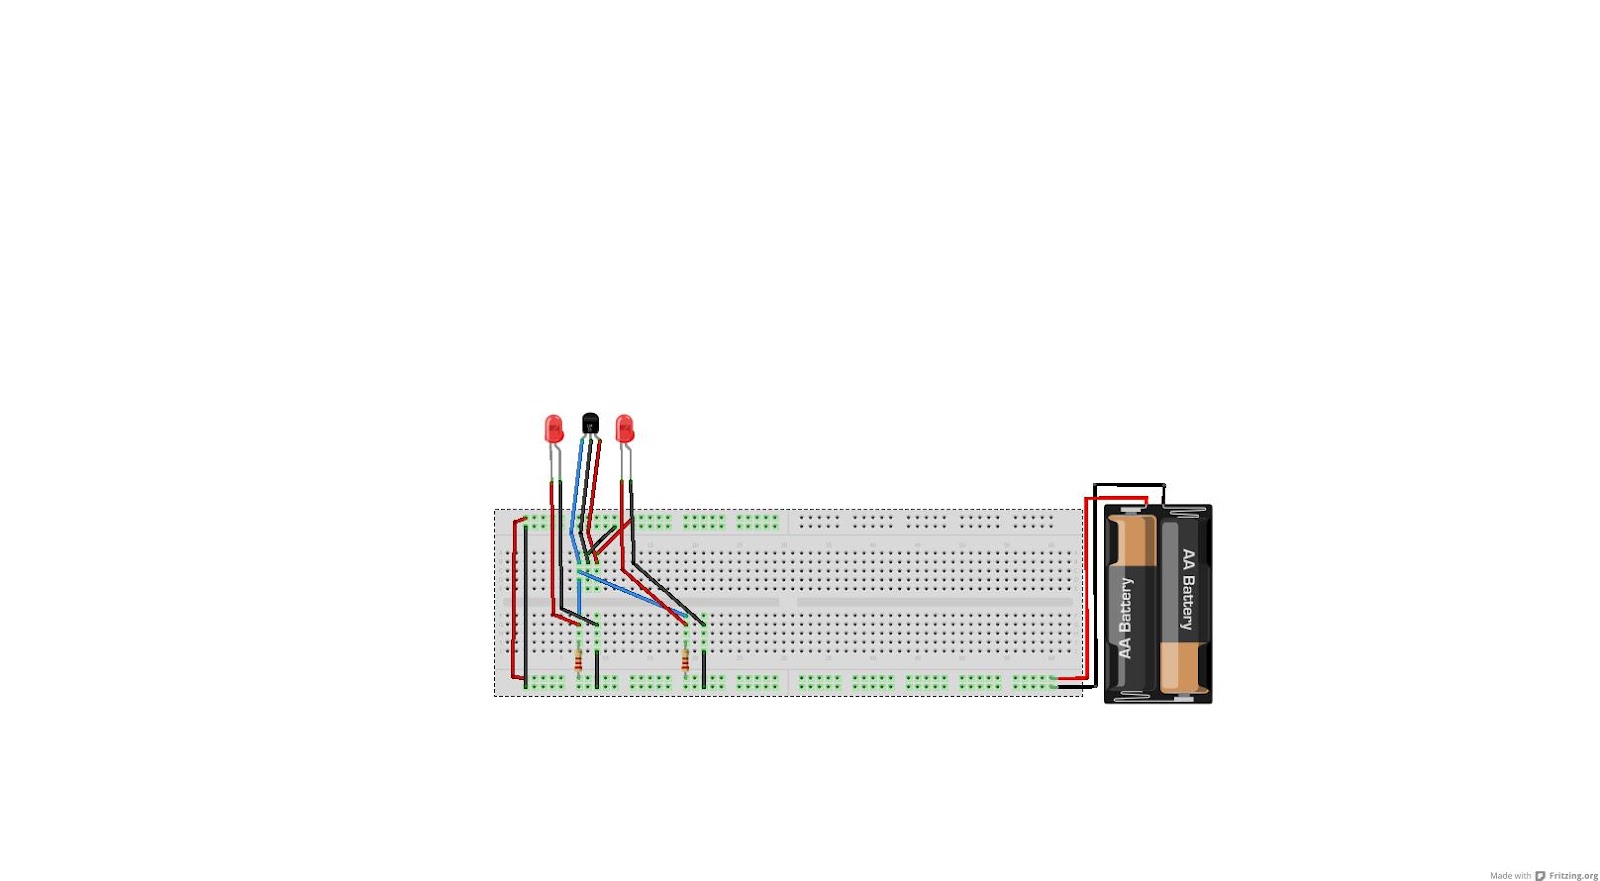
As of right now, the Tilt Maze project is set up for the most part, with minor tinkering that has to be done. We have most of the code finished. I'd say it's about 85% done and the physical maze is at about 90-95% completion, with a couple minor adjustments that need to be made.
I've posted a few progress pictures up and I'll post the code when we are finished.
http://i.imgur.com/8VUrF.jpg
http://i.imgur.com/OdMLe.jpg
http://i.imgur.com/HEEqa.jpg
http://i.imgur.com/ZY8kx.jpg
http://i.imgur.com/YKl7q.jpg
Thursday, April 26, 2012
Monday, April 2, 2012
Media Controller Project


Media Controller Project - By Anthony Coppola and Mike Johnston
Controller guided Servo Tilt Maze
What We Did : For our project, myself and Mike embarked to create a maze game that would replicate the angle of a small controller using servo's underneath the maze itself. We would connect tilt sensors to the inside of the controller, and it would then send the information to the arduino to tell the servo's which direction to go. The servo's would act as a balancing mechanism as well as a tilt controller for the maze.
How we did it : We used a small, light wooden box from Micheal's, the arduino, a breadboard, some tilt sensors from Adafruit, rubber balls and a PSP tin from a party store, rubber tubing, a steel rod, and hanger nails from Ewing Hardware, and some wood from Home dept. We used the bottom portion of the box as housing, and the cover as the actual maze, we connected the servo's to the rod , and then that to the rubber ball which acted as a ball and socket joint for the maze. We then attached the tilt sensors to the PSP tin, connected that to the arduino, connected the arduino to the servos, and with the generous help of the fantastic people in class including our teacher Avani, we were able to write the code to get the sensors "talk" to the servo's.
What we learned : All in all, it was a fun project conceptually, but it was very challenging to us. We unfortunately did not get it to work in time for the presentation, but we learned a ton about servo's and prototyping. It was an enjoyable project with a lot of potential and I know that with more time, some more resources and energy, we could have submitted this to the art gallery.
Here is the code from our project
//Tilt maze by Ant C and Mike J
#include <Servo.h>
int tiltPinX = 7; // Gravity switch connected to pin 6
int tiltPinY = 6; // Other gravity switch connected to pin 7
int posX = 0;
int posY = 0;
Servo servoX;
Servo servoY;
int valX = 0;
int valY = 0;
int count = 0;
void setup()
{
servoX.attach(10); //attaches servo 1 to digital pin 10
servoY.attach(11); //attaches servo 2 to digital pin 11
count++;
pinMode(tiltPinX, INPUT); //intialize tilt sensor 1
pinMode(tiltPinY, INPUT); //intialize tilt sensor 2
// Serial.begin(9600); //sets up serial monitor for 9600 baud
}
void loop()
{
valX = digitalRead(tiltPinX); //reads tilt sensor 1
valY = digitalRead(tiltPinY); //reads tilt sensor 2
// Serial. println (" Value of tilt sensor X: " + valX); //displays tilt sensor X in serial monitor
// Serial. println(" Value of tilt sensor Y: " + valY); //displays tilt sensor Y in serial monitor
if(valX == LOW)
{
posX = 0;
servoX.write(-15);
delay(15);
count = 0;
} else
{
count = 0;
for(posX = 0; posX <45; posX++)
{
servoX.write(15);
delay(15);
}
}
if(valY == LOW)
{
posY = 0;
servoY.write(-15);
delay(15);
count = 0;
} else
{
count = 0;
for(posY = 0; posY <45; posY++)
{
servoY.write(15);
delay(15);
}
}
if(count == 8000)
{
servoX.write(0);
servoY.write(0);
}
}
Friday, March 30, 2012
Data Viz Show
I recently went to visit the IMM gallery's show and I was pleasantly surprised at what I found. When I walked in, I saw a wide range of different art pieces ranging from typical drawings to clever forms of expression that are quite modern and unusual in a gallery. The one that stuck out is the bot-controlled Counter-Strike game in which every time a player dies, a bit of red blood shoots out of a nozzle to simulate the killing in a much more real sense. By the time I went to the gallery, the wall and floor had been soaked in red blood. Next to the blood was a large pile of small pieces of paper that had various twitter feeds printed on it. I was told that on the first day, the rate that the paper was going would envelop the whole room so the artist had to adjust the feed to make it write less. These two are perfect examples of how even when you think a project it done, minor and sometimes even major tweaking is never out of the question and very possible after submission of a final product. The gallery as a whole was fascinating and a very insightful experience in my opinion, and I would like to see more of these in the upcoming future.
Physical Computing's Greatest Hits
http://www.tigoe.net/blog/category/physicalcomputing/176/
This reading is based on Tom Igoe's blog post about Physical Computing's Greatest Hits. While reading this, I noticed a bunch of new cool gadgets and inventions that were very intriguing to me, specifically the gloves and the multi-touch interfaces. For my stupid pet trick, I attempted to create a wearable project, and to my dismay, it was a bit out of my league in terms of creation, implementation, and actually making it work was a pain in it self. But I learned a good amount of stuff from trying new things and I was especially excited to read through this. The multi-touch interfaces have also been something that I have always wanted to see and try out, but never had the chance to. I know that Microsoft released a prototype sometime last year with an outrageous estimate, so I know that mass market production won't happen for some time, but it's still something to look forward to. All in all, this was a good read with many very cool and neat ideas that I will definitely try to implement in my final project.
This reading is based on Tom Igoe's blog post about Physical Computing's Greatest Hits. While reading this, I noticed a bunch of new cool gadgets and inventions that were very intriguing to me, specifically the gloves and the multi-touch interfaces. For my stupid pet trick, I attempted to create a wearable project, and to my dismay, it was a bit out of my league in terms of creation, implementation, and actually making it work was a pain in it self. But I learned a good amount of stuff from trying new things and I was especially excited to read through this. The multi-touch interfaces have also been something that I have always wanted to see and try out, but never had the chance to. I know that Microsoft released a prototype sometime last year with an outrageous estimate, so I know that mass market production won't happen for some time, but it's still something to look forward to. All in all, this was a good read with many very cool and neat ideas that I will definitely try to implement in my final project.
Tuesday, March 27, 2012
HotPot Rotary Potentiometer Presentation

For my sensor presentation, I chose the HotPot Rotary Potentiometer. It is a sensor that had a force sensitive ring that detects position. Although it looks very similar to the iPod scroll wheel, it is not the same type of sensor. It is used is a few various well known objects like joysticks and electric guitars.

.jpg)
.jpg)
.jpg)
.jpg)
.jpg)
.jpg)
.jpg)
.jpg)
.jpg)
.jpg)
.jpg)
.jpg)
Thursday, March 8, 2012
Bent Wire Crank Toy
For this project, we had to get wire, I picked up 14 AWG wire because it seems the most stable while also being able to bend easily, and by following the guide in Make magazine, we would be able to make a wire crank toy that had a bird dip its head. Once I assembled the parts and started cutting the wire, I noticed first that the measurements on the guide were either way off, or meant for tiny hands. Either way, I doubled what was said in the guide and it worked out a bit better. However, once I got to the coil, I found a bit of difficulty. It was not very simple to bend and it took quite a while to get a shape that vaguely resembled a coil structure. After about 10 minutes of struggling, I finally accepted the coil-esque shape and moved on. I delicately pieced out the other shapes needed to create the toy, and I had a better outcome than I originally thought. It wasn't how it looked in the picture, but it was a passable recreation. After doing this project, I feel that given the right tools, I would definitely be able to do another project like this, as I have learned some tricks and methods of what works and what does not.
Toy Paper Monster
.JPG)
.JPG)
.JPG)
Chapter 0:What is electricity really?
The author starts this chapter by describing electricity in its most basic form, at the atomic level. He then talks about how electricity works, what conducts electricity and what insulates it and why this all happens. I imagine the author of this chapter as a fresh new teacher that is trying to be hip with his students and get them interested in science. It is a very basic understanding of what goes on and it seems to be aimed at people that have absolutely no idea what electricity is, how it works, and what it's made of. And because I have not take a science class in well over 2 years now, I found it refreshing to recall all of this information, but it seems to be a bit dumbed down for the actual target audience.
Tuesday, March 6, 2012
"August 2026: There Will Come Soft Rains"
This short story is about a futuristic home that is in a world that has been ravaged by war and famine. The particular home that is referenced has long since been abandoned by it's owners, but the robot servants continue on as if they were still there. Unfortunately, a brush fire starts near the home, and the robots are unable to quell the fire in time. This short story felt very close to the worlds created in movies like I,Robot and Back to the Future part II. It had a clear message that the overuse of technology will eventually kill us but I have to disagree with the story. It is a very one-sided view of this controversial topic and it generalizes our dependence on technology. While the increase in our dependence has exploded over just the past 10 years, this story seemed just a bit too extreme. I felt that the sudden fire at the end was seemingly out of nowhere and also kind of rash.
Inside the Mind of a Synaesthete
Back in high school, I had a friend who was in a band named Synesthesia. When I asked him what it meant, he told me that it was the ability to see music in bright vibrant colors. He said it was a magical thing that he hoped people would relate to after they heard his band. Now years later, I'll never forget watching them play and imagining little fireworks going off while they were playing their original songs and always ending with a glorious Freebird cover. Also, after seeing a personal description of how it isn't all fun and games to have this disease, my mind is a bit conflicted on how to feel about it. While it is a cool thing to think about and wonder what it would be like to have it, I would not want to have it in the slightest. Whether its the sound to color, or color-word association, this would seem to me to be more of an annoyance than anything else. The most interesting part that I learned about this disease was the story of a couple who both have synesthesia had a child and the colors that the child saw when looking at a certain letter were the mixtures of the colors the two parents saw.
Wednesday, February 22, 2012
Project Pictures!
.JPG)
.JPG)
.JPG)
.JPG)

Final Projects Pictures finally uploaded. It took me quite a while just to get the setup but I am relatively happy with the outcome. Unfortunately, I wasn't able to fix the problem with the sensor, and I did not showcase it as I wanted to, but that's the learning process. I showed the class what I have, and I can just hope for next time that I am more well prepared for the project and at least now I know how long before a project is due to order a part that I need. I will definitely continue working on this, maybe get a thinner breadboard, perfect the wiring, and get a smaller battery, possibly a coin cell battery, to conserve space, and maybe more lights.
Project Day
Went in early to get the project finished and I started to solder, but the sensor broke. I quickly went to find Avani and John to see if they could help me. Luckily, John had an extra sensor. I hooked it up and an hour before class started, I think that I might have blown this sensor out. I had to make due with that and deal with what happened. I will post pictures in a bit when I can.
Final Night Post
Obviously I might have posted this late but better late than never. I went out get some of the things I need. I went to Home Depot to get magnets and electric tape, and found the perfect gloves at Target for a dollar. When I got home, I was successfully able to test everything and it seemed that I had everything all set up. Unfortunately I do not have the soldering iron so the electric tape will have to do. I have everything set up, and now all I have to do is go in early tomorrow and solder it together, connect the pieces and put it all together.
Wednesday, February 15, 2012
Saturday, February 11, 2012
First Post!
I've been researching the hall effect sensor for the past couple of days now. Basically, I am trying to create, in a sense, an E.T. glove that will light up the index finger when another person with a different glove gets close with their index finger, like the famous scene in the movie. I am trying to figure out the best way to put together my project without it being bulky or terrible. Sofar, I have found thin grey gloves to act as a housing for the wires and the LED's but I may have to figure out an alternative place to but the breadboard and the arduino.
Subscribe to:
Comments (Atom)